So, you finally decided, the paper documents have got to go! The clutter is too much. The time it takes to find a file is too much. That coworker who never puts things back is too much! Not to mention, all that free space is going to become the big breakroom corporate has been promising you 😉
You’ve already gotten your free quote, the budget has been approved, and today the contracts just got signed. All the hard work is done… right? Unfortunately… no… now you need to PACK! So, you ask yourself, “Where do I even start!?”
Based on my years of getting clients’ documents packed and out the door, here are 6 Steps to have a smooth pack-up and start to your scanning project:
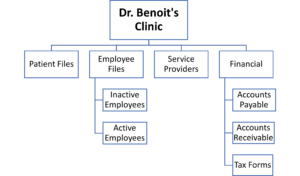
I) Finalize the folder hierarchy of the electronic files before packing up any of the paper files.
You already have your paper files organized in the cabinets, but that may not be how you want them to be organized electronically. The folder hierarchy describes what the top level folders will be, what the subfolders will be, what the sub-subfolders will be, and continue that on all the way down until you get to the PDFs. Once this is determined, you can start packing your paper files.

II) If needed, rearrange the paper files in the filing cabinets
Once the documents are put into the boxes, the documents will live in those boxes for the rest of the project. In order to never misplace documents, we never mix boxes once they’re in our possession. So, if the files need to be rearranged in order to match the folder hierarchy you determined above, you should rearrange everything BEFORE putting documents into the boxes.

III) Purchase and fold boxes.
We buy almost all our boxes off Amazon in packs of 30. These are a great price and it’s nice to have delivery so quick and easy. The hard part is folding the boxes! I’ve had many paper cuts trying to fold these quickly. (Not that we would race each other!) Be sure to fold the boxes as the instructions say. If you fold them wrong, then your documents could fall out! Here’s a step-by-step video on how to fold these boxes:
IV) Place documents into the boxes.
This seems easier than it actually is, but here’s a couple pro tips!
- Lay box sideways and use gravity to your advantage.
- Don’t pick up too many papers at one time; go slow and steady!
- Alternate which hands you’re using. (My tennis elbow reminds me of this tip every day!)
- Don’t overfill your boxes. This can cause your box to break and increase the risk of losing documents.

V) Label the outside of the boxes.
Keep labels simple, you don’t need to write a whole sentence. Use abbreviations to save time. Don’t write the name of your company on the outside; this is redundant and therefore waste’s your time. Don’t label lids; label the sides of the boxes. Use a bold marker; please don’t make me put my glasses on just to read your tiny pencil markings!

VI) Schedule pickup before you finish packing.
We can normally come get your boxes fairly quickly. But if you pack 500 boxes and block your hallways and then have to wait a week for us to arrive… you might upset a few employees not to mention the fire code enforcer.

But do you really have time to do all this packing? You’ve got your normal job, and now this too! Instead, you can hire us to come pack for you! We bring in a team of employees with premade boxes and are normally in and out in just a few hours. Fill out this request for a quote and we can help price out your packing needs while we price your scanning project!

You must be logged in to post a comment.